Policy Conditions
Overview
Conditions are one of the criteria that form a policy defining how a resource is accessed. Conditions dictate the method, location, duration, etc., before a resource can be accessed.
Key Points
-
Conditions are created as a profile on the Policies > Conditions page of the Cyolo admin portal.
-
The Conditions profile is referenced in a rule while configuring applications.
-
A Conditions profile can be defined either within an individual application or at the category level.
-
A default profile is auto-created on the Conditions page. This profile cannot be deleted. Unless otherwise configured, the default profile is pre-defined in every rule.
-
Multiple custom profiles can be created, each for a specific purpose.
Parameters of a Conditions Profile
Device Posture Check - Enable the option and select the Device Posture profile from the drop-down. A profile must have been created on the Policies > Device Posture page for the profile to be listed here.
Note: The option Enable the device posture feature on the Configuration > Global Settings page must be enabled for this option to be visible here. Refer to this section: Other Global Settings.
Require MFA -- Enable the toggle button to enforce Multi-Factor Authentication (MFA) on users accessing a resource. The following options are available to configure when this condition is enforced:
-
Once in a session - User is prompted for MFA once every session.
-
Once in a period -- Define a period when a user is prompted. The periods are Days, Weeks, and Months. MFA is required once and remains active during the period. When the period expires, MFA is required again.
-
First-time rule access -- User is prompted for MFA the first time when the rule under which this profile is defined is triggered by a user. This is in addition to the MFA, if any, when logging in to the Applications Portal.
Note: Users authenticated through an IdP whose MFA is configured as External are exempt from this requirement. Cyolo recognizes these users as having already completed MFA at the IdP level and treats them as MFA-verified.
Require device certificate -- This option restricts access to devices with a device certificate signed by a particular Certificate Authority (CA). There are two options to set the CA:
-
Any certificate -- Selecting this option allows a device with a certificate signed by any CA, whether private or public.
-
Trusted certificate -- Select this option and choose the CA certificate from the drop-down list. The CA certificate must have been uploaded on the Policies > Trusted Certificates page to appear on the list.
For more information on uploading CA certificates, refer to the section: How to Create a Trusted Certificate
Require MS-ADCS Certificate Template OID -- Enable this option and enter the Object Identifier (OID) of a specific Microsoft Active Directory Certificate Template. By specifying the OID of a certificate template, you ensure that only certificates adhering to the defined template's policies are accepted, adding an additional layer of security and compliance to the authentication process.
Geolocation -- This option allows or denies user access based on their country of origin. Choose either Allow or Deny and select the country from the drop-down list. If Deny is selected for a country, users from that country will be denied access to the resource. If Allow is selected for a country, only users from that country will be granted access, and users from other countries will be denied.
Source IP address: This option allows or denies users based on their IP addresses. Select either Allow or Deny, and then choose the IP source object from the drop-down list or create a new object by clicking the + icon. The source can be a single IP address, a range of IP addresses, or a subnet. Both subnet mask and CIDR formats are supported.
-
If Deny is selected for a source, users with IP addresses defined within the IP source object will be denied access to the resource.
-
If Allow is selected for an IP source, only users with IP addresses defined in the IP source object will be granted access to the resource.
-
IP sources can be created either from the drop-down list or on the Policies > IP Source page. For more information on creating IP sources, refer to the section: How to Create an IP Source.
Users require approval from an approver to access the application -- Enabling this option requires users to obtain permission from a designated approver before accessing a resource.
Request types user can choose from are:
-
Immediate -- The user is granted immediate access to the resource.
-
Scheduled -- The user is presented with the Access Request Form window, where they must specify the date and time for access. An email will be sent to the approver with the user's request. If access is granted, the user will be able to access the resource at the specified time.
-
Both -- The user is given the option to select either immediate or scheduled access.
Users must fill out the access request form before they can access the application -- If this option is enabled, the Access Request Form will include an additional field where the user must specify the reason for their request. The user must choose one of the following reasons:
-
I need to provide remote support
-
I need to fix a bug
-
Other Time
Require Quantum-Safe Cryptography With this option, the TLS handshake must use the MLKEM protocol which is resilient to attacks that use quantum computers.
NoteMLKEM is supported by the Chrome and Firefox browsers, as well as by the Cyolo Connect agent.
Block based on connection method - This setting allows you to define one or more connection methods - for example, VPN, Tor, Proxy, etc. - that will be blocked as part of the policy. See definition of each connection method below.
IMPORTANT
In order to use this feature, assure that your IDAC has access to
services.cyolo.io.
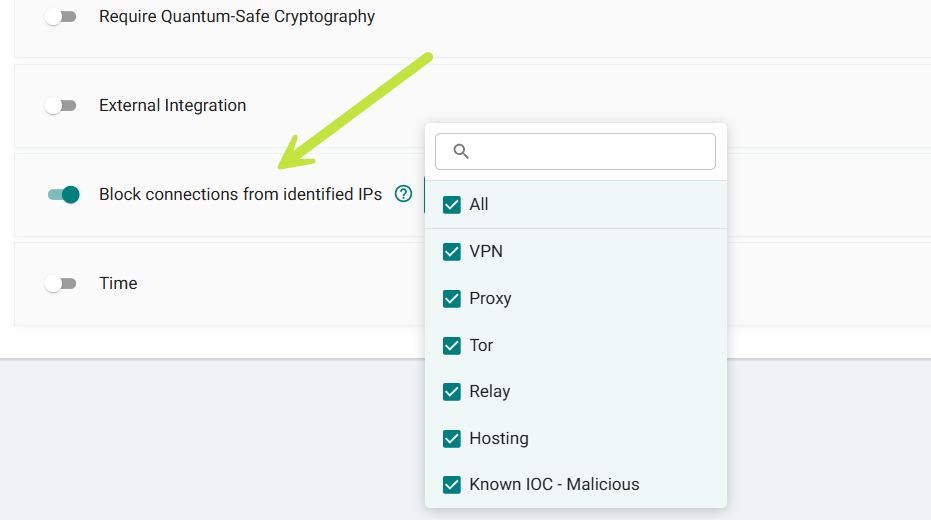
Connection Methods
- VPN: Source IP belongs to a known commercial or consumer VPN exit node.
- Proxy: IP is listed as an open or anonymous proxy service.
- Tor: IP is a Tor exit node used to anonymise traffic.
- Relay: Connection is routed through a recognised anonymising relay or forwarding service (non-Tor).
- Hosting: IP is allocated to data-centre or cloud-hosting infrastructure, not a residential ISP.
- Known IOC – Malicious: IP is associated with known threat actors, abuse, or malicious activity based on threat intelligence.
External Integration - With this option, you can use a webhook that you integrated as a a Policy condition. Select the webhook from the dropdown list. See Configuring Webhooks.
Time -- Enabling this option will allow the portal admin to set the days when the resource can be accessed. Additionally, the admin can set a time window in hours and minutes when the resource can be accessed.
⚠️ Daylight Saving Time (DST) is not currently supported by the platform. If the selected timezone observes DST, admins need to manually adjust the timeframe whenever DST starts or ends to ensure accurate alignment with the intended local access hours.
Updated about 1 month ago