Configuring LDAP Integration
This integration allows Cyolo to:
- Authenticate AD Users:
- Users can log in to Cyolo using their LDAP credentials. Cyolo communicates with the LDAP server to verify the user's identity.
- Centralize User Management:
- By integrating with LDAP, Cyolo uses a centralized directory for user information, ensuring consistency and simplifying user management.
- Streamline Access Control:
- User roles and permissions defined in LDAP can be enforced in Cyolo, providing a seamless way to manage access to resources based on existing directory policies.
- Enhance Security:
- LDAP integration supports multi-factor authentication (MFA) and other security measures, enhancing the overall security posture of the organization.
- Automate Enrollment:
- New users can be automatically enrolled and activated based on LDAP information, reducing administrative overhead.
Prerequisites
- Administrator privileges to configure IdP in Cyolo.
- The user credentials of an AD user.
- LDAP server details, such as IP address of the server, user Base DN, and user DN.
- Active Directory Certificate Services must be installed in the AD server to configure LDAP over TLS (LDAPS). For more information, refer to this Microsoft article: Step by Step Guide to Setup LDAPS on Windows Server.
- The root CA certificate of the AD server must be uploaded to the Policies > Trusted Certificates page of the Cyolo admin portal to successfully integrate to the LDAP server over TLS. For more information, refer to the section: How to Create a Trusted Certificate.
Configuration
-
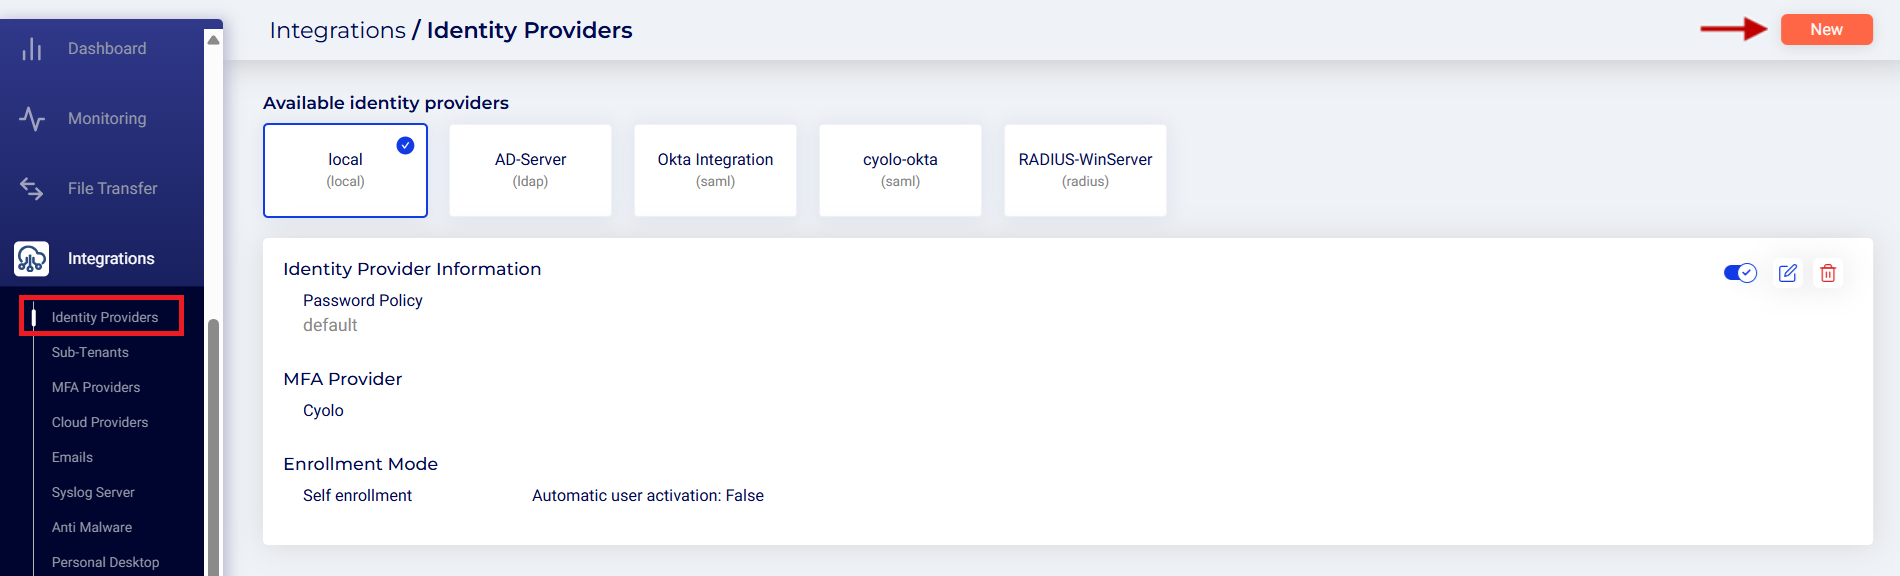
Log in to the Cyolo admin portal with your admin credentials.
-
Navigate to the Integrations > Identity Providers page.
-
Click the New button located at the top-right corner of the screen.
Step 1: Identity Provider Type
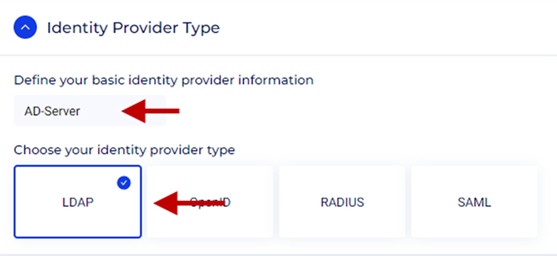
- Define your basic identity provider information - Enter a unique name.
- Select LDAP under Choose your identity provider type.
Step 2: Identity Providers Details
-
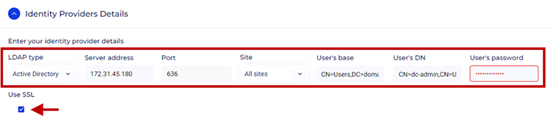
LDAP Type: Select Active Directory from the drop-down menu.
-
Server Address: Enter the internal IP address or name of your Active Directory LDAP server.
-
Port: The default port set here is 389, which is the default port for LDAP. To configure LDAP over SSL/TLS, which is more secure, change it to 636. The checkmark Use SSL must be enabled for LDAP over SSL/TLS.
-
Site: Choose the site for the LDAP server. The default is All sites.
-
User's Base: The User's Base or Base DN (Distinguished Name) is the starting point within your LDAP directory from which search for users begins. It specifies the location in the LDAP directory tree where user entries are stored. Typically, this includes the organizational unit (OU) or container where user accounts are located. For example: CN=Users,DC=domain,DC=cyolo,DC=io.
-
User's DN: Enter the distinguished name (DN) of the LDAP user. For example, CN=dc-admin,CN=Users,DC=domain,DC=cyolo,DC=io.
- Extracting the attributes of a user from the AD server is described in the appendix later in this article.
-
User's Password: Enter the password for the LDAP user.
-
Use SSL: If your LDAP server requires SSL, check the Use SSL checkbox.
-
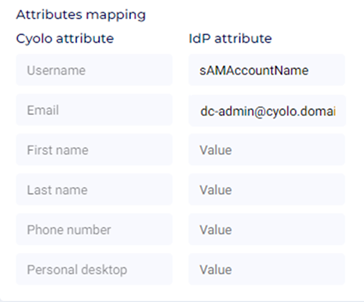
Attributes Mapping: This is used to map attributes between Cyolo and AD. These can be found under the Attribute editor section.
- Username: Map the Cyolo attribute Username to the LDAP attribute (e.g., sAMAc-countName).
- Email: Map the Cyolo attribute Email to the corresponding LDAP attribute. Enter the attribute name used for email in your LDAP directory (e.g., mail).
- First Name: Map the Cyolo attribute First name to the corresponding LDAP attribute (e.g., givenName).
- Last Name: Map the Cyolo attribute Last name to the corresponding LDAP attribute (e.g., sn).
- Phone Number: Map the Cyolo attribute Phone number to the corresponding LDAP attribute (e.g., telephoneNumber).
- Personal Desktop: Map the Cyolo attribute Personal desktop to the corresponding LDAP attribute, if applicable.
Step 3: MFA Parameter
- MFA Provider: Ensure that the MFA Provider is set to Cyolo. This will enforce MFA for added security.
- Available MFA methods
- Scan QR code: This option enables the use of QR codes for authentication. Users can scan the QR code with an authenticator app on their phone to generate a one-time code.
- Provide phone number: If this option is selected, users can use their phone number for MFA. They may receive a verification code via SMS or a phone call.
- Provide email address: This option, when selected, will allow users to use their email address as one of the authentication methods. They might receive a verification code or link via email.
By default, all three are selected.
- Editing sign-in methods
- Allow users to change their sign-in methods - If this option is enabled, users will have the ability to change their selected MFA methods. This gives them flexibility to switch between different methods as needed.
For this article, we will leave it unchecked.
- Allow users to change their sign-in methods - If this option is enabled, users will have the ability to change their selected MFA methods. This gives them flexibility to switch between different methods as needed.

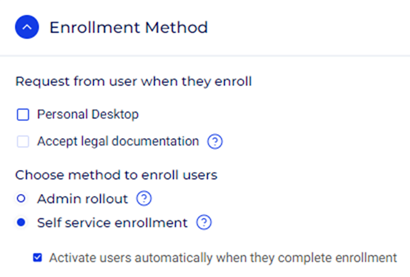
Step 4: Enrollment Method
These settings are used to control how users enroll into the Cyolo user database.
Request from user when they enroll:
- Personal Desktop: When selected, users will be required to register their personal desktop device during enrollment.
- Accept legal documentation: If selected, users will need to accept legal documents or terms and conditions as part of the enrollment process.
For this article, we will leave these options unchecked.
Choose the method to enroll users:
- Admin rollout: Enrollment is managed and initiated by an administrator.
- Self service enrollment: Users can enroll themselves into the system. This option allows users to self-register, which is often more scalable.
- Activate users automatically when they complete enrollment: When this is checked, users are activated immediately upon completing the enrollment process.
For this article, we will select Self service enrollment and enable the Activate users automatically when they complete enrollment option.
- Activate users automatically when they complete enrollment: When this is checked, users are activated immediately upon completing the enrollment process.
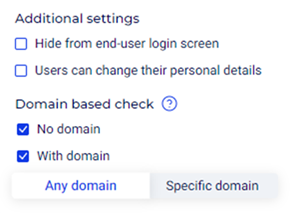
Additional Settings:
- Hide from end-user login screen: This option hides the enrollment method from the users' login screen.
- Users can change their personal details: Allows users to update their personal information after enrollment.
Domain based check:
- No domain: Indicates that no domain-based restrictions apply to the enrollment.
- With domain: Enables domain-based restrictions for enrollment.
- Any domain: Allows enrollment from any domain.
- Specific domain: Restricts enrollment to users from specific domains.
For this article, we will select Any domain and check the checkboxes for both the No domain and With domain options.
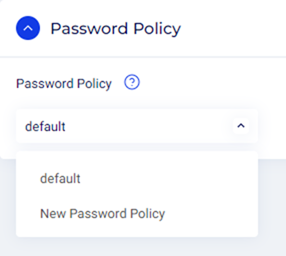
Step 5: Password Policy
-
Password Policy:
- Select the password policy from the available password policies.
For a detailed overview on Password Policies, refer to the section: How to Create a Password Policy.
For this article, we will select the default password policy.
- Click the Save icon to create the LDAP profile.
Immediately upon clicking the Save icon, the LDAP profile will attempt an LDAP bind operation. If any of the information under the Identity Providers Details section is found to be incorrect, the operation will fail and the profile will not be saved. Verify the details and retry the operation.
- Select the password policy from the available password policies.
-
Cyolo Admin Portal
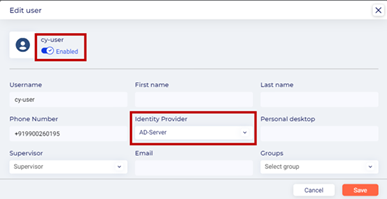
- Once the user has logged in to the Cyolo Application Portal, the user is now listed on the Identities > Users page.

- Edit the user and you can verify it has the LDAP server in the Identity Provider field. Notice how the user is automatically enabled. This is due to our selecting the Self service enrollment and Activate users automatically when they complete enrollment options, under Choose method to enroll users in the Enrollment Method section.
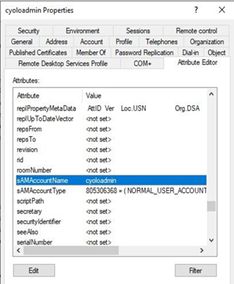
Appendix: Extract DN from Active Directory
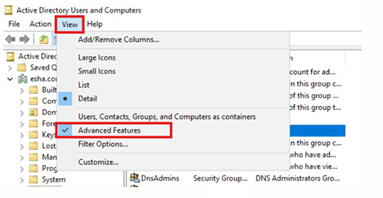
- On the AD server, open Active Directory Users and Computers.
- Click the View menu at the top and select Advanced Properties.
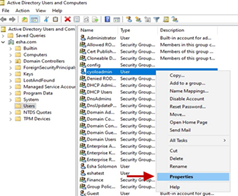
- Right-click on the user whose attributes are required, and click Properties.
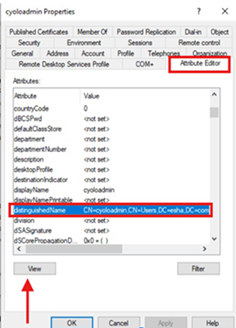
- Click the Attribute Editor tab and locate the attribute distinguishedName.
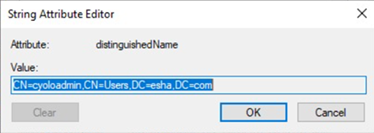
- Click View and copy the content of Value.
- Do the same to find out other attributes.
LDAP Error Messages
The following are some possible error messages that users could receive with LDAP integration.
Note: The original LDAP errors are captured by the activity log.
- If the user's password has expired: Password has expired.
- If the user enters an invalid username or password: Invalid username or password.
- If the password fails to meet password policy requirements: Password fails to comply with policy.
If the issue is due to account expiration, a locked account, or other LDAP/system errors, these messages will be captured in the activity log but not displayed to the user. Instead, the following is displayed: We couldn't sign you in. Please contact your administrator.