How to Create Users
Prerequisites
- For an overview of the Identities feature, refer to the section: Identity Management.
Configuration
-
Log in to the Cyolo Admin Portal.
-
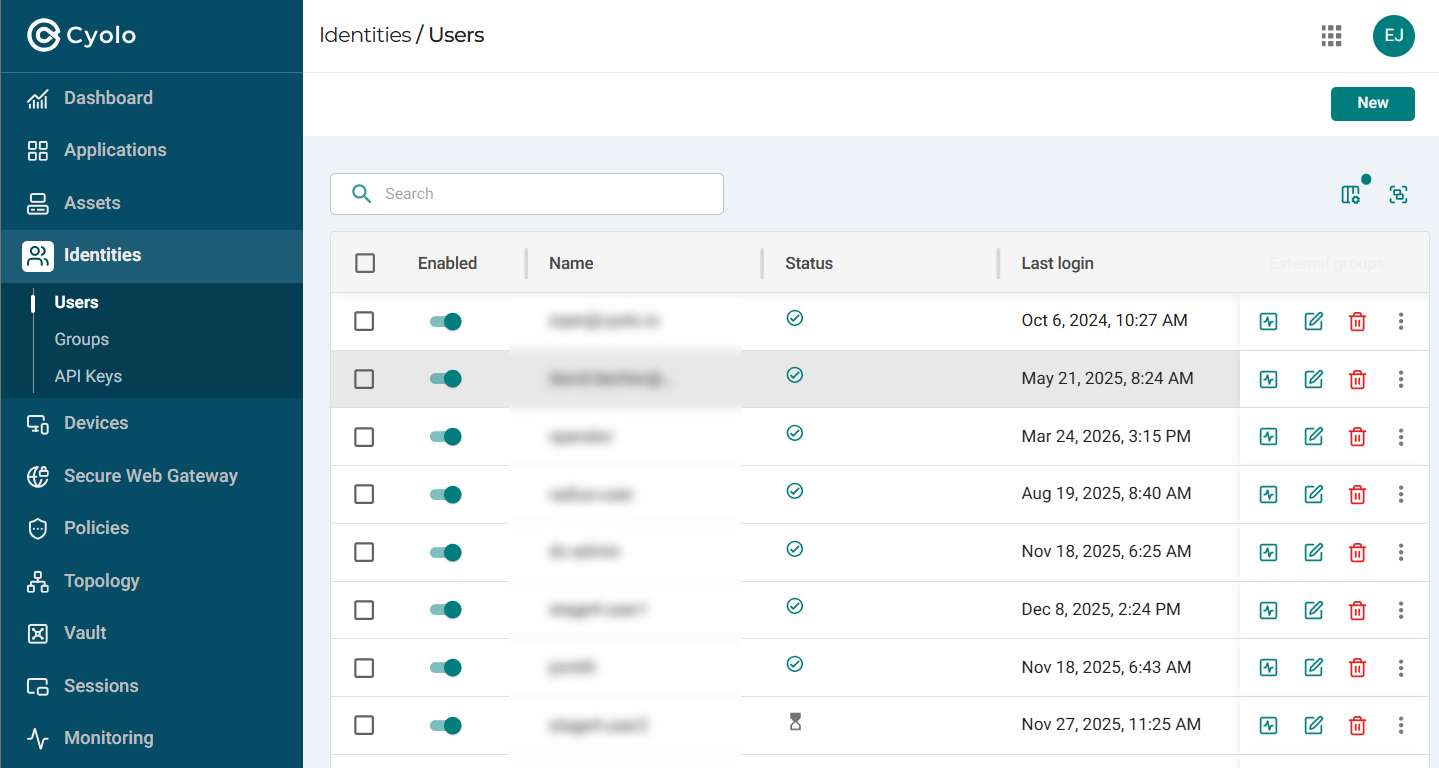
Navigate to the Identities > Users page.
-
Click the New button in the top right corner of the page.
- In the Add User window, enter the following information in each field:
User Profile
-
Username -- Enter the username of the user. If this user belongs to an external IdP, the username must match the IdP username.
-
First name -- Enter the first name of the user. This field is optional.
-
Last name -- Enter the last name of the user. This field is optional.
-
Email -- Enter the email address of the user. This field is optional; however, if MFA is configured, an email address is required to receive the OTP.
-
Phone Number -- Enter the phone number of the user. This field is optional; however, if MFA is configured, a phone number is required to receive the OTP.
-
Condition Profile (optional) - Select the condition profile to evaluate during login. If the user does not meet the profile’s conditions, access will be denied.
-
Valid from - Set the date from which the user will be able to start logging into the system. This field is optional.
-
Valid until - Set the date from which the user will not be able to log into the system anymore. This field is optional.
-
Send email invitation - When the password option is set to “End-user defined,” enabling this option sends the user an email invitation with a secure link. The link is valid for 7 days and allows the user to create their own password.
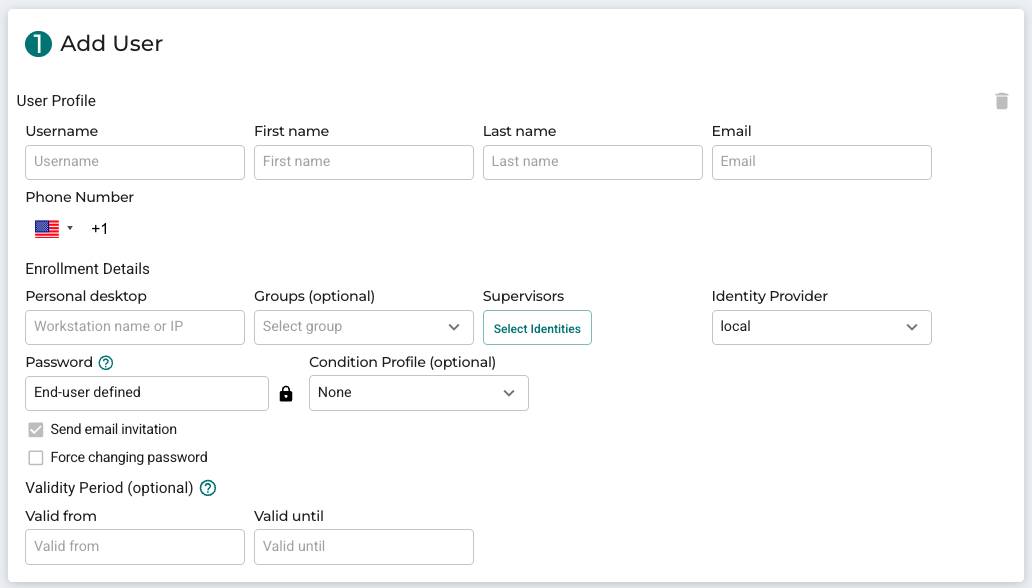
Enrollment Details
-
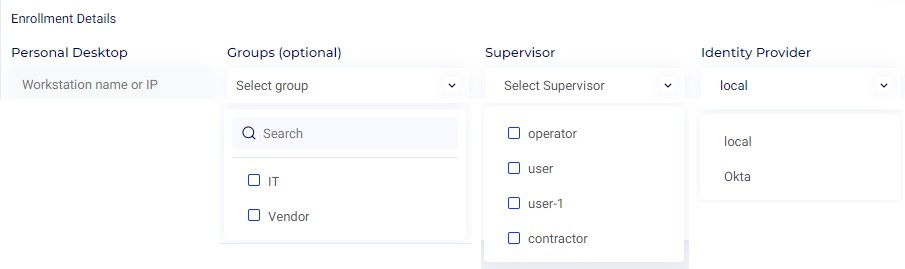
Personal Desktop -- Enter the workstation IP address of the user, or another internal IP address, to log in remotely using RDP. This is an optional field. For more information on the Personal Desktop feature, refer to the section: Configuring Personal Desktop.
-
Groups (optional) -- From the drop-down menu, select a user group to add the user to the group.
-
Supervisors -- Select users from the drop-down menu to choose the supervisor(s) to approve the user's login to the Cyolo Application Portal. Multiple supervisors can be selected. This is an optional field. Note: Selecting a supervisor(s) here replaces the MFA option configured on the Configuration > Global Settings page. For detailed information on supervision, refer to the section: Supervision and Auditing Roles.
-
Identity Provider -- Select the IdP from the drop-down list. The default is set to local. External identity providers must be configured on the Integrations > Identity Providers page for them to be listed here. Select the IdP where the account of this user is created.
Password
- Password - Enter the password for the user. The password must meet the constraints set in the password policy selected on the Integrations > Identity Providers > local page. The tooltip that appears when the admin clicks on this field displays the minimum password requirements as defined in the policy. For more information on password policy, refer to the section: How to Create a Password Policy.
Note: The Password option is available only if local is selected in the Identity Provider field.
-
Send email invitation -- This option sends an email to the configured email address informing the user of the account creation and inviting them to log in. The option is enabled by default and can be disabled. This option is available only if local is selected in the Identity Provider field.
-
Force changing password -- This option forces the user to set a new password when logging in to the Application Portal for the first time. The option is enabled by default and can be disabled. This option is available only if local is selected in the Identity Provider field.
- Click the Save button in the top right corner of the page to create the user.
Note: Users are not created until clicking the Save button in the top right corner of the page.
- Click Add more to create more users.
User Status
The status of a newly added user on the Users page when supervisor approval is set is Waiting for Enrollment.
Other Options
The following options are available to the admin when hovering the mouse over a user.
-
Move to logs - Click this option to redirect to the Monitoring > Activity page with the filter set to "Source Name =[username of the user]", and the page listing the log messages related to the user.
-
Edit - Clicking the edit button will open the Edit user window. The window has the following fields that can be edited:
-
Enable or disable the user
-
Username
-
First name
-
Last name
-
Phone number
-
Identity provider
-
Personal desktop
-
Supervisor
-
Email
-
Groups
-
-
Delete - Click this icon to delete the user.
-
More - Click the vertical ellipsis icon for more options.
a. Reset Password - Clicking this option will open the Reset Password window. Enter a new password and verify it by re-entering. Optionally, enable the checkboxes alongside Send email invitation and Force changing password.
b. Reset Enrollment - Clicking this option will open the Reset Enrollment window. Click the Reset button to reset the enrollment. This will set the user status to Waiting for enrollment. The user must be approved by the supervisor configured for the user before the status changes to active.
Importing Users
-
On the Users page, click the Add button.
-
In the top right corner of the screen, click the down arrow to download a template of the CSV file.
-
Edit the file in a text editor and fill in the fields.
-
In the Add window, click the up arrow and select the file to upload.
CSV Format for Importing Users
You can copy and paste the block below into a CSV file.
name,first_name,last_name,email,password,phone_number,personal_desktop,supervisor,idp,enabled,must_change_password,send_emailThe fields are:
- name
- first_name
- last_name
- password
- phone_number
- personal_desktop
- supervisor
- idp
- enabled
- must_change_password
- send_email