Exporting Logs to Other Destinations
Security Information and Event Management (SIEM) and Extended Detection and Response (XDR) integrations improve security detection and response times. They also promote:
- Compliance: Saving logs for an extended period of time makes compliance easier.
- Analytics: Ease of building dashboards to analyze user activity across many platforms.
- Threat Hunting: Searching for vulnerabilities.
- Malware Threat Scanning: Checking for specific threats to your systems.
Collectively, SIEM and XDR centralize all logs from all systems so that administrators can holistically view users' activities across a wide variety of software.
Cyolo supports log exportation to S3 buckets and Syslog. This article describes how to export Cyolo logs to configured destinations.
Prerequisites
Exporting to AWS S3:
- You must have AWS S3 storage capability - to which the logs can be transferred - and then activate the S3 connector in your SIEM/XDR.
- You must have an SQS message queue where the SW3 publishes notifications.
- Integration of the cloud provider and/or the Syslog server in the Admin console, as described in detail below.
- If you are using identity access management roles for credentialing, make sure that a role was previously set in AWS.
- If you are using an API key for credentialing, create an API key in Cyolo’s vault. For more on creating an API key secret, see How to Configure Secrets.
Exporting to Syslog:
- A direct communication from Cyolo to your SIEM/XDR (no need for an intermediate S3 bucket).
- Integration of the cloud provider and/or the Syslog server in the Admin console, as described in detail below.
Ensure that you set the firewall for outbound traffic - for all IDACs in the selected sites.
Integrating Syslog Servers
Follow the steps below to integrate a Syslog server to which logs can be exported.
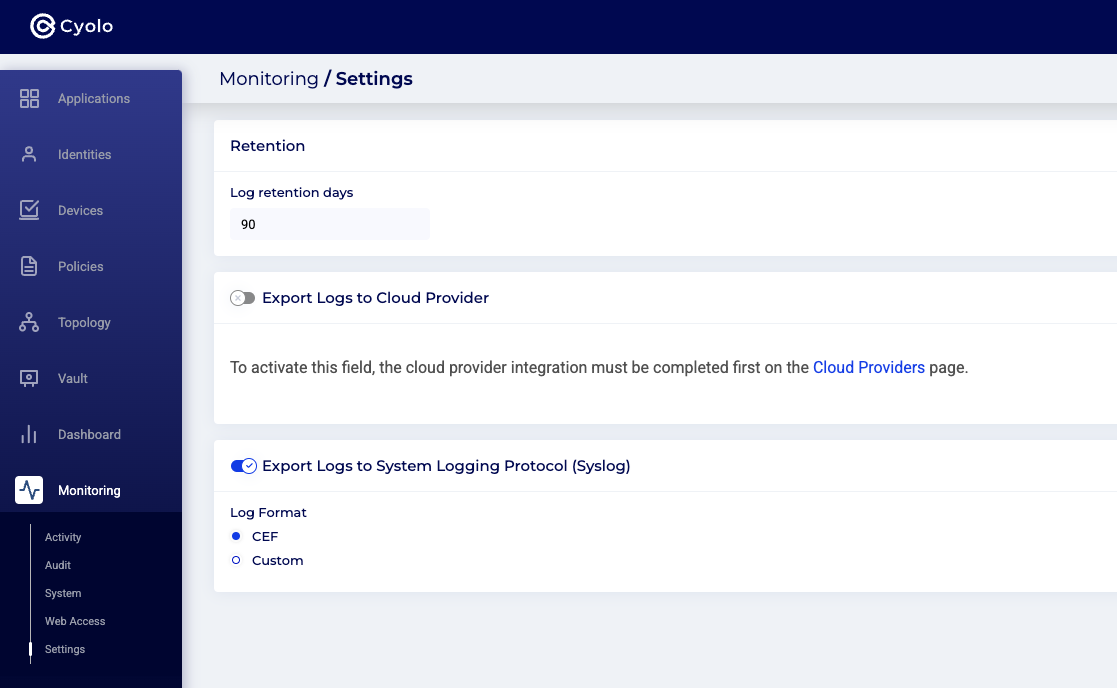
Step 1: In the Admin console, navigate to the Monitoring > Settings screen. The system logging protocol is disabled by default, as shown in the screenshot below:

Step 2: Toggle on the system logging protocol. The screenshot below will appear and set the desired log retention days.
Optional: Toggle the Log Format and customize the log format.
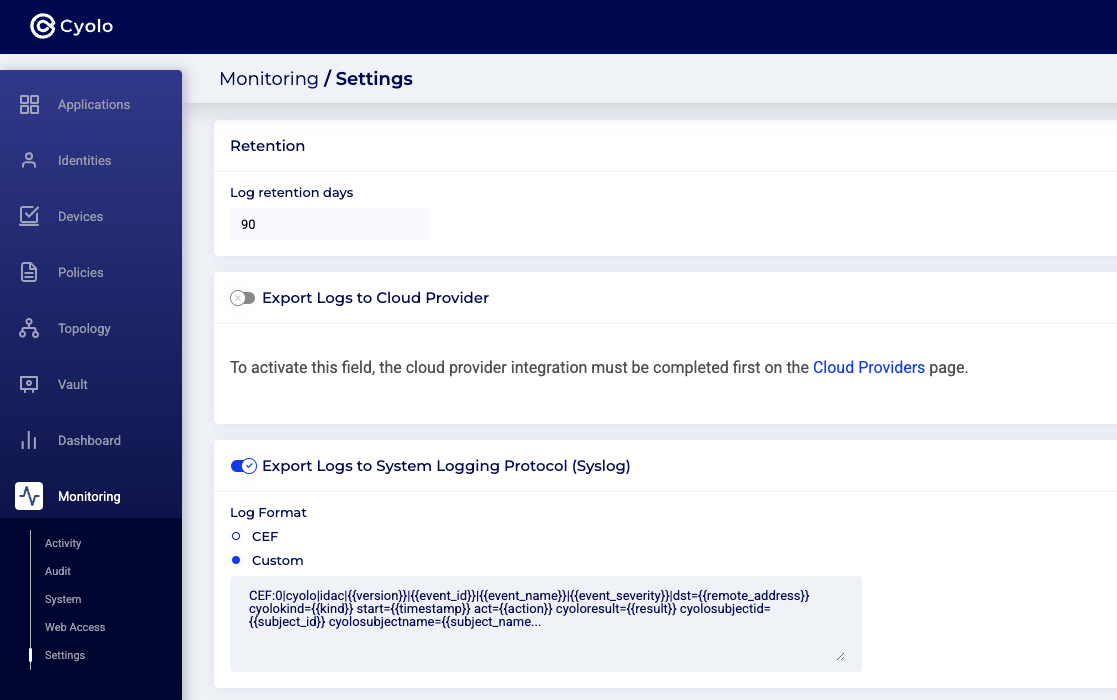
The following is the default CEF format:
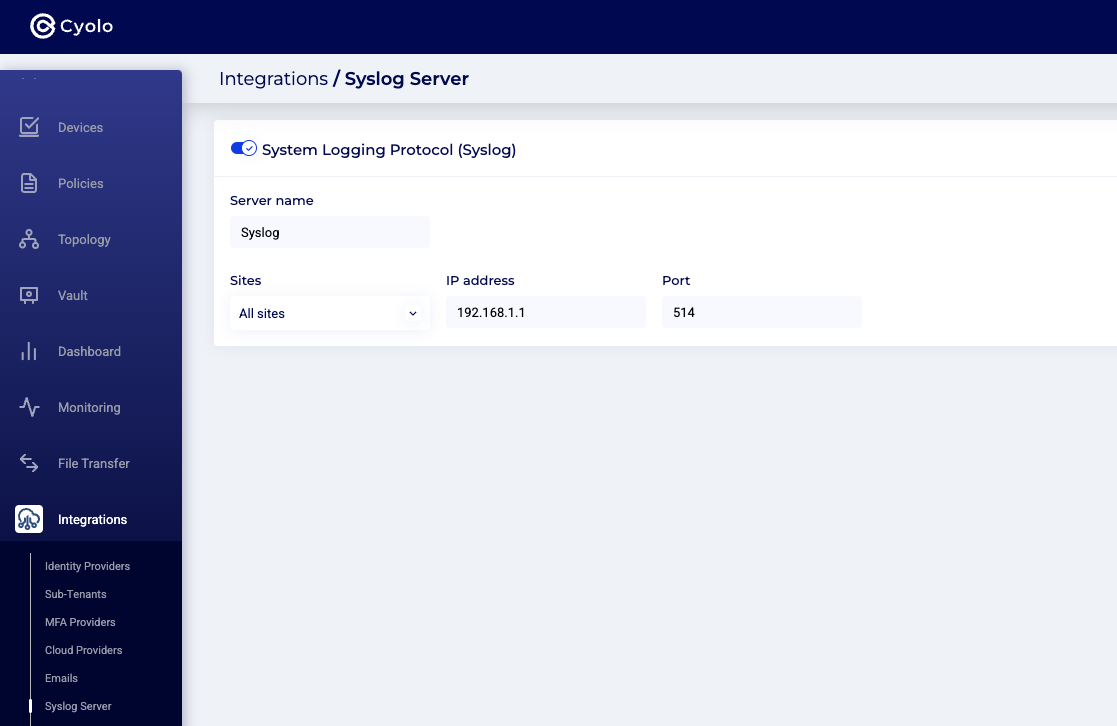
"CEF:0|cyolo|idac|{{version}}|{{event_id}}|{{event_name}}|{{event_severity}}|dst={{remote_address}} cyolokind={{kind}} start={{timestamp}} act={{action}} cyoloresult={{result}} cyolosubjectid={{subject_id}} cyolosubjectname={{subject_name}} cyolosubjectkind={{subject_kind}} cyoloauthkind={{authority_kind}} cyoloauthid={{authority_id}} cyoloauthname={{authority_name}} cyoloobjkind={{object_kind}} cyoloobjid={{object_id}} cyoloobjname={{object_name}} cyolosessionid={{session_id}} msg={{message}} cyolodstid={{node_id}} cyolouagent={{client}} cyolocountrycode={{country_code}} cyolotransid={{transaction_id}} cyolocredentialsorigin={{credentials_origin}} cyolocredentialsid={{credentials_id}} cyolocredentialsname={{credentials_name}}"Step 3: Navigate to Integrations > Syslog Server. Type in the server name, select a site or multiple sites from the drop-down, and enter the IP address and the UDP port number. Then click the orange Save button the in top right-hand corner.
Alternative Method Without UI
You can set up a destination server to accept syslog messages by adding the following line in docker-compose.yml:
SYSLOG_ADDRESSES=udp://<IP address>:514For example:
SYSLOG_ADDRESSES=udp://172.31.22.134:514In this example, the destination SIEM server IP address is 172.31.22.134.
If required, you can also send TCP messages using the alternative way (this is not yet possible with the UI):
- SYSLOG_ADDRESSES=tcp://<IP address>:514Integrating Cloud Providers
Follow these steps to integrate the cloud provider to which logs will be exported.
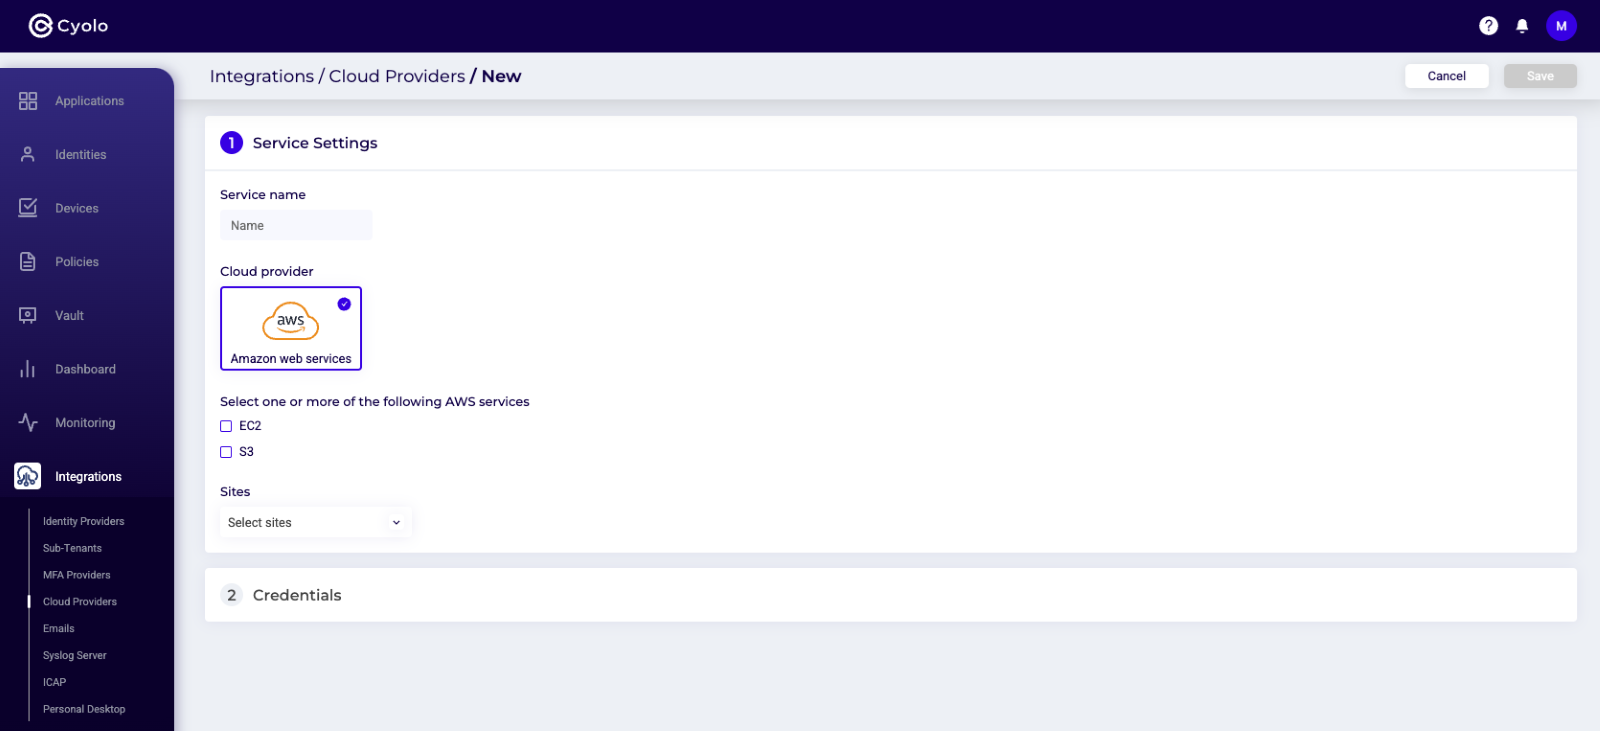
Step 1: In the Admin console, navigate to the Integrations > Cloud Providers screen and click the orange Add New Cloud Provider button in the right hand corner.
Step 2: In the Service Settings bloc (card #1 in the screenshot below), fill in the Service name. This should be something that is intuitive and that can be easily searched for/located. Click AWS as the cloud provider.
Step 3: Select EC2 or S3, or both, as the cloud computing and/or storage options.
Step 4: Select specific site(s) that you would like to have access to the AWS account
Note: We provide the flexibility for the admin to restrict the access to the AWS from specific sites.
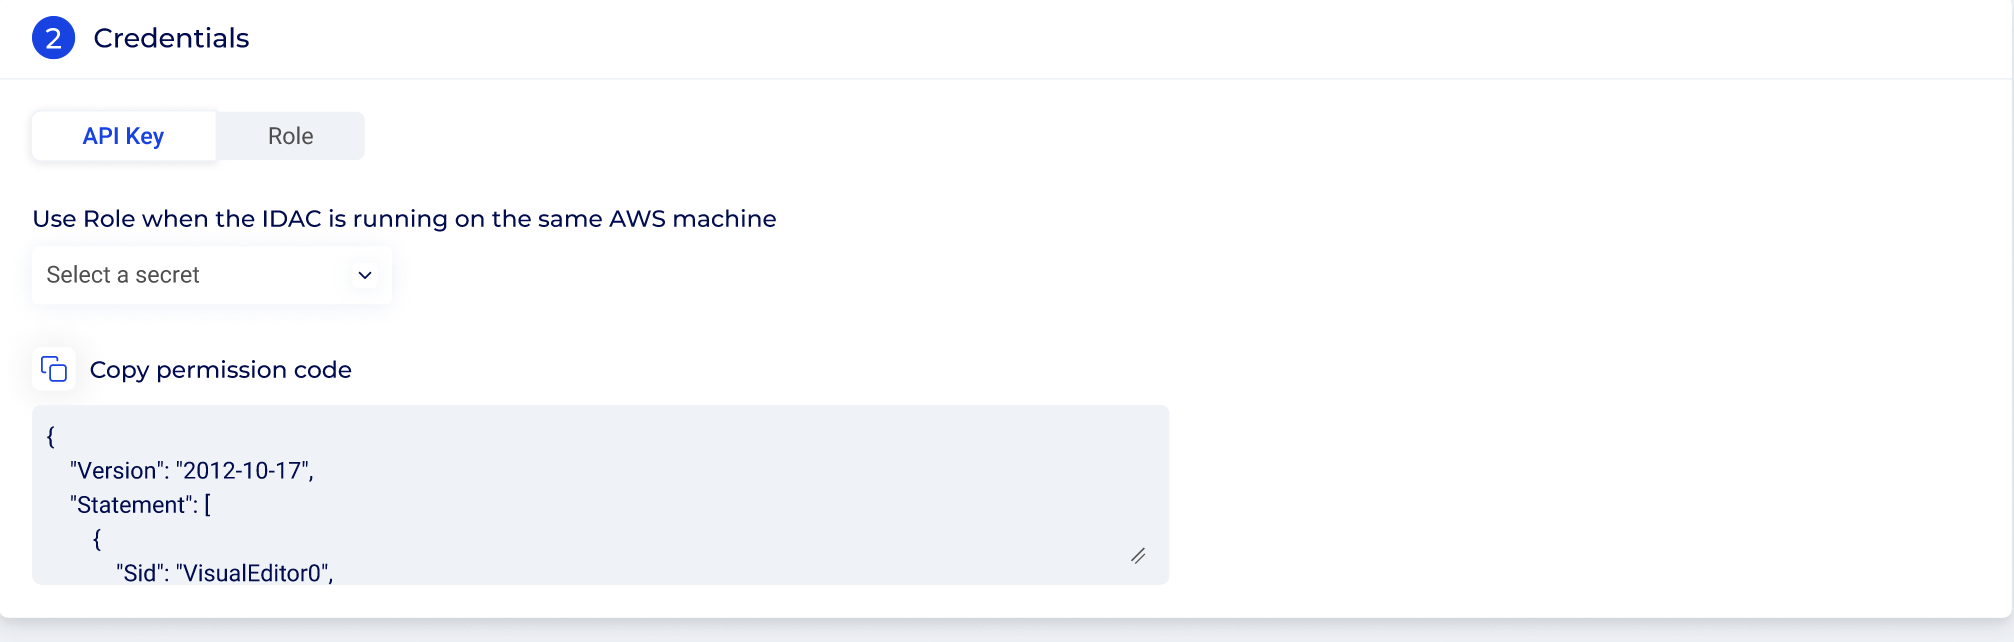
Step 5: In the Credentials bloc (card #2), there are two authentication methods, represented by two tabs:
- API Key: The API keys can be used to authenticate and authorize access to the cloud provider service. You can create an API key secret in Cyolo’s vault, or you can select the secret from the drop-down. For instructions on how to create secrets, see section How to Configure Secrets.
- Role: Identity access management role credentialing for authentication can be used when the IDAC runs on the same AWS machine. Please make sure that a role was set previously set in AWS.
For both API Key and role credentialing, Cyolo generates the permission code. Copy the permission code as shown in the screenshot below for either the API Key or Role tabs, and paste it into AWS.
Note: It is recommended to restrict the access to specific resources on AWS and not to keep it wide open - e.g., restrict access to a specific S3 bucket:
"Resource": [

                "arn:aws:s3:::<bucket name>",

                "arn:aws:s3::: <bucket name>/*"

            ]
Step 6: Click the orange Save button at the top right to complete the integration.
Configuring Logs for Export
Step 1: Navigate to the Monitoring > Settings screen in the Admin console:

Step 2: Toggle on the Export Logs to Cloud Provider button, and set the AWS Provider details. The screenshot below will appear. Set the desired log retention days and then click the orange Save button.
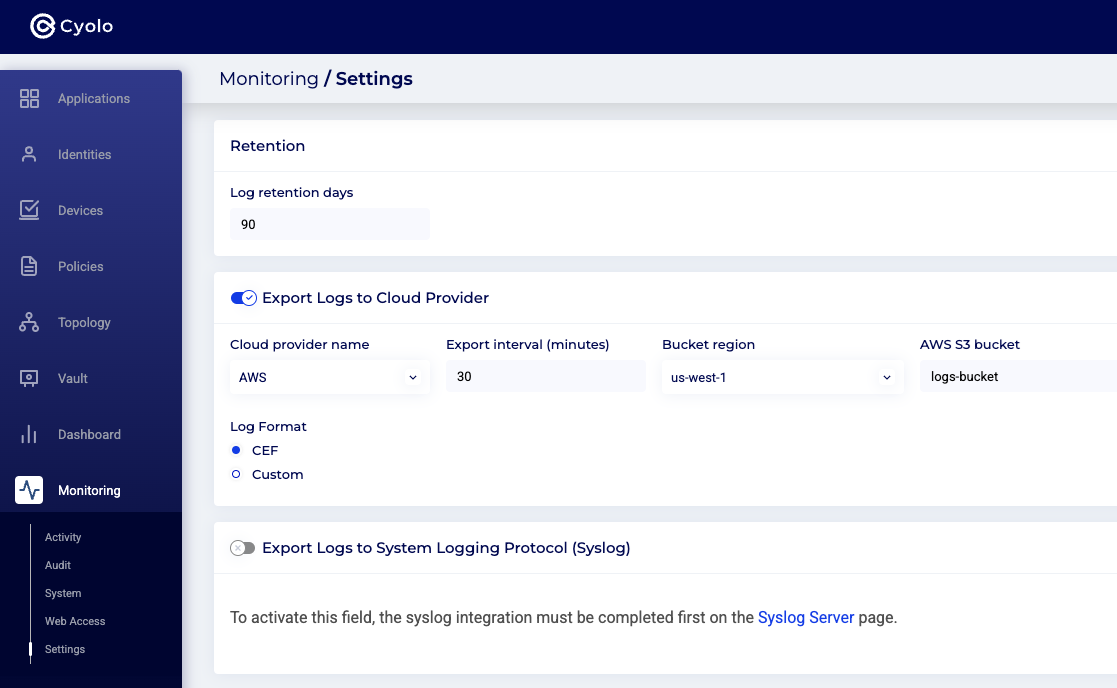
Optional: Toggle on the Log Format button, and customize the log format.

The following is the default CEF format:
"CEF:0|cyolo|idac|{{version}}|{{event_id}}|{{event_name}}|{{event_severity}}|dst={{remote_address}} cyolokind={{kind}} start={{timestamp}} act={{action}} cyoloresult={{result}} cyolosubjectid={{subject_id}} cyolosubjectname={{subject_name}} cyolosubjectkind={{subject_kind}} cyoloauthkind={{authority_kind}} cyoloauthid={{authority_id}} cyoloauthname={{authority_name}} cyoloobjkind={{object_kind}} cyoloobjid={{object_id}} cyoloobjname={{object_name}} cyolosessionid={{session_id}} msg={{message}} cyolodstid={{node_id}} cyolouagent={{client}} cyolocountrycode={{country_code}} cyolotransid={{transaction_id}} cyolocredentialsorigin={{credentials_origin}} cyolocredentialsid={{credentials_id}} cyolocredentialsname={{credentials_name}}"Additional Notes:
- Integration, editing, deletion, and success/failure testing of an integrated cloud provider or a Syslog server will be reflected in the System logs (Logs > System).
- The multi-site feature was released in version 4.2, released in June 2023. If you have not upgraded to this version or you do not find this version available to you in your Admin Console, contact your Cyolo representative at [email protected].