IDAC
Prerequisites
Before starting the offline installation, make sure you have your our Cyolo license file and certificate/key pairs ready and available.
Installation Steps
- Log in to the target Linux machine where the Cyolo IDAC will be deployed.
- Download and extract the TAR file.
Create a new folder:
mkdir /home/cyoloSwitch to the newly-created folder:
cd /home/cyolo/Download the TAR ball:
curl -O https://cyolo-public.s3.eu-central-1.amazonaws.com/offline/<Version>-cyolo-build.tar.gzNote: Replace <Version> with the appropriate version number.
For demonstration purposes, we will be installing version 6.6.1.
curl -O https://cyolo-public.s3.eu-central-1.amazonaws.com/offline/6.6.1-cyolo-build.tar.gzYou can choose which version to download here.
Extract the TAR ball:
tar –zxvf <Version>-cyolo-build.tar.gzNote: Replace <Version> with the appropriate version number.
tar –zxvf 6.6.1-cyolo-build.tar.gzSwitch to the extracted folder:
cd /home/cyolo/tmp/cyolo-buildNote: For available downloadable versions, refer to Cyolo documentation or contact Cyolo Support.
- Prepare the license and certificates.
Name the Cyolo License File: Rename the license file to license.cyolo and move it to the extracted build directory:
mv /path/to/license.cyolo /home/cyolo/tmp/cyolo-build/Prepare the Certificates:
Rename the certificate and key files to cert.pem and key.pem, respectively, and move them to the extracted build directory:
mv /path/to/cert.pem /home/cyolo/tmp/cyolo-build/
mv /path/to/key.pem /home/cyolo/tmp/cyolo-build/- Execute the Cyolo Installer.
Navigate to the Cyolo Build Directory: Ensure that you are in the correct directory where the installer script is located:
Run the Installer: Execute the offline installer script and choose the IDAC installation option:cd /home/cyolo/tmp/cyolo-build/You will see a screen like this:./offline-installer.sh PG offline
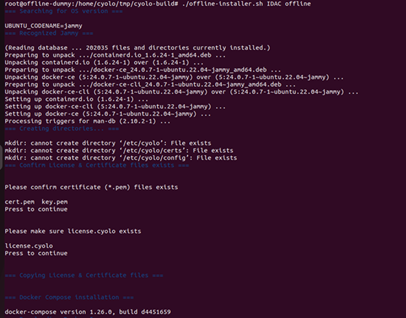
Follow the instructions to complete the installation.
-
Modify the configuration file.
Edit the Docker Compose Configuration: Modify the docker-compose.yml file to reflect the correct upstream settings:nano /etc/cyolo/config/docker-compose.ymlUpdate the following -
volumes:
-
- /etc/cyolo/config:/config
- /etc/cyolo/certs:/certs
- /etc/cyolo:/dbdata
- Environment:
- UPSTREAM=tcp.cyolo.io:443
- UPSTREAM_SNI=tcp.cyolo.io
- ALLOW_SYSTEM_APPS_ANALYTICS=true
- SITE=name of the SITE
- RAFT_JOIN=true
-
Note: Confirm the values for Upstream and Upstream SNI with Cyolo support as they may vary depending on your deployment architecture.
- Pull the IDAC Docker image (for online sites).
If you have online access, pull the IDAC Docker image to retrieve the image digests:
Replacedocker pull cyolosec/idac:${version}${version}with the appropriate version number. (for example: 6.6.1 in our case). - Start the IDAC Docker container.
Bring up the IDAC Docker container using the following command:docker-compose -f /etc/cyolo/config/docker-compose.yml up -d
- Reset the Admin user's password, to secure the installation:
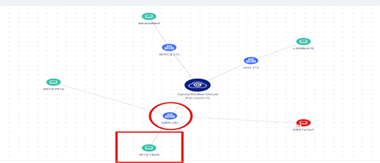
To confirm the successful installation of your IDAC, visit the Admin console of your tenant and navigate to Topology on the left panel. Then click IDACs. You will see the new IDAC in the list of your IDACS.docker exec -it config_idac_1 bash ./idac tinker admin reset-password <password>

You can also confirm by going to the Topology subsection, where you can see your newly-created IDAC.