Device Policies
The primary objective of this feature is to restrict and/or regulate end-user outbound connections, including internet traffic and internal network access, based on the environment or location that the device is connecting the agent from, or based on the status of the agent.
Methods to regulate outbound access include:
- Allow, deny, or limit access based on specific conditions. These conditions depend on the physical location of the device making the connection.
- Based on the conditions, determine whether restrictions should be imposed when the agent is connected or disconnected.
- Policies defining these conditions can be created and applied to users and user groups. Each policy can be customized to suit the network environment or other factors.
Scenarios:
- Public Wi-Fi Access: When a device with Cyolo Connect is connected to public Wi-Fi, all outbound traffic can be blocked to enhance security.
- Non-Secure Public Environments: When a device is in a non-secure public environment and Cyolo Connect is disconnected, outbound traffic can be blocked to prevent unauthorized access.
- Corporate Network Access: When a device is determined to be within the corporate network, corporate resources can be accessed directly through the network. In such cases, using Cyolo Connect to access these resources could introduce unnecessary overhead. A device policy can be configured to block connections to internal resources via Cyolo Connect, reducing redundant traffic and simplifying access.
Determining the Network Environment
Network Indicator
The following methods are used to detect the type of network to which the device is connected:
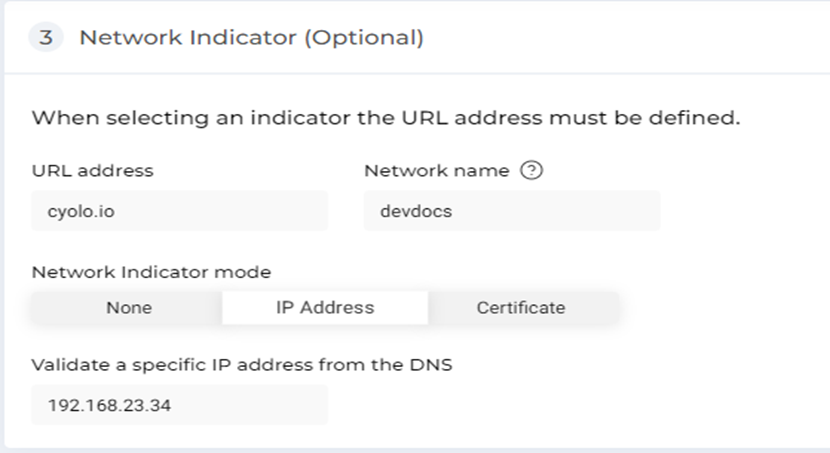
- URL address – Perform a connectivity check to a public or private URL entered here.
Network Indicator mode –- None: No connectivity check is performed.
- IP Address: Enter the expected IP address from the name resolution of the URL entered above. For example, if the URL resolves to a private IP when connected to the corporate LAN, enter that private IP address here. The agent performs name resolution from the user’s network and compares the resolved IP address with the one entered here. If the addresses match, the network indicator test is considered successful; if they do not match, the test is considered a failure.
- Certificate: Select a CA certificate from the drop-down. The certificate must be uploaded on the Policies > Trusted Certificate page. The Cyolo platform will search for a user certificate signed by the selected CA in the device’s certificate store.
- Network Name: Enter the internal network name of a corporate resource. Cyolo will perform a connectivity check to this network name.
Note: Configuring Network Indicator is optional.
Configuring Device Policy
Network Policy
This is considered the core of the Device Policies feature. This section determines the policy to be implemented (or the action to be taken), based on the success or failure of the network indicator tests specified above.
- Unrestricted Connectivity: Select this option to apply no restrictions to the device’s outbound access. All traffic, including ping, DNS resolution, and internet traffic, is allowed.
- Restricted Connectivity: Select this option to block all outbound traffic from the device. This includes ping, DNS resolution, and internet traffic.
- Allowed Domain Names and/or IP Addresses: Administrators can whitelist specific URLs and IP addresses entered in this field, allowing connections to these resources while other traffic could be restricted.
When to Apply the Policy
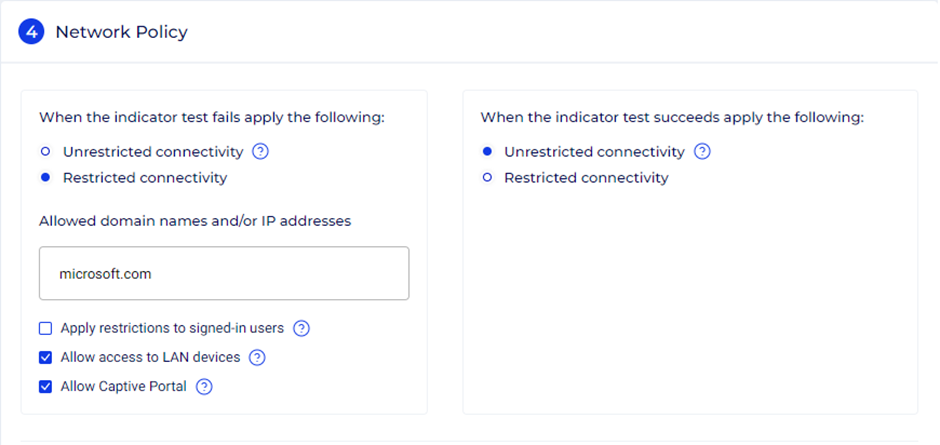
If network indicators are configured, administrators can choose to apply the network policy based on whether the network indicator test fails or succeeds.
Optional settings for restricted connectivity – The following options are available when the Restricted connectivity option is selected:
- Apply restrictions to signed-in users – By default, this option is not selected; therefore, the policy, irrespective of the network indicator test results, is applied only when Cyolo Connect is disconnected. Enabling this option will apply the policy only when the agent is connected.
- Allow access to LAN devices – Enabling this option will allow end users access to their local network and its shared resources such as printers and shared drives. This option is disabled by default. This option is available if the network indicator test fails or succeeds.
- Allow Captive Portal – This option is available only when the When the indicator test fails apply the following option is selected. Enabling this option will allow temporary access to any captive portal required to establish internet connectivity. Captive portal is detected in the following manner:
- All outbound TCP connection is permitted for the first 15 seconds in the new network.
- The agent starts polling for access to captive.cyolo.io:80 every second.
- If HTTP 204 No Content response is received, TCP connectivity is restricted again.
- If a response other than HTTP 204 is received, a captive portal is assumed to be present in the network and TCP connectivity is left permitted.
- TCP connectivity will be restricted again once captive.cyolo.io:80 returns HTTP 204.
Known captive portal detection hosts are automatically whitelisted. The list of the hosts are given below.
List of hosts, IP addresses, and ports automatically whitelisted by Cyolo Connect:
- DNS connectivity (TCP/UDP 53, UDP 5353, UDP/TCP 853)
- DHCP connectivity (UDP 67-68 and UDP 546-547)
- Loopback connectivity
- IPv4 broadcast (255.255.255.255)
- IPv4 multicast (224.0.0.0/4)
- IPv6 multicast (ff00::/8)
- The ZTNA tenant host
- bugsnag.com
Known captive portal detection hosts whitelisted:
| MacOS | captive.apple.com msftconnecttest.com |
| Windows | msftncsi.com msftconnecttest.com |
| Linux | 204.pop-os.org nmcheck.gnome.org ping.archlinux.org conncheck.opensuse.org network-test.debian.org connectivity-check.ubuntu.com |
| Others | clients3.google.com detectportal.firefox.com connectivitycheck.gstatic.com captive.cyolo.io |
For more information on creating device policies, refer to the section: Creating Device Policies
Updated about 2 months ago